1. Introduction
The Network File System is certainly one of the most widely used network services. Network file system (NFS) is based on the Remote procedure call. It allows the client to automount and therefore, transparently access the remote file systems on the network.
2. Scenario
In this scenario we are going to export the file system from the linuxconfig.org (IP address 10.1.1.200) host and mount it on linuxconfig.local(IP address 10.1.1.100).
3. Prerequisites
At this point, we assume that the NFS service daemon is already installed on your system, including portmap daemon on which NFS setupt depends. Moreover, your system needs to support the NFS file system.
$ cat /proc/filesystems
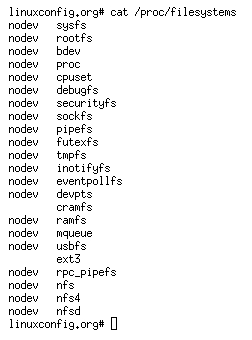
NFS daemon should be listening on both standard ports 2049 and portmap on port 111.

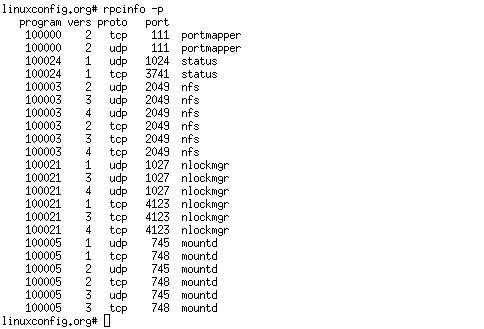
Another way to check if NFS is functioning, is to use the rpcinfo command.
# rpcinfo -p
You should get a response/output similar to one below:
4. Server export file
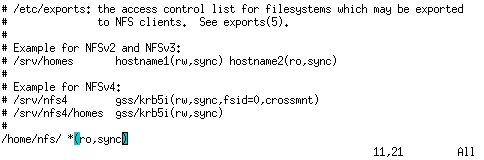
All NFS server exports need to be defined in /etc/exports file.
4.1. Most common exports options
Here are the most common export techniques and options:
| /home/nfs/ 10.1.1.100(rw,sync) | export /home/nfs directory for host with IP 10.1.1.100 with read, write permissions, and synchronized mode |
| /home/nfs/ 10.1.1.0/24(ro,sync) | export /home/nfs directory for network 10.1.1.0 netmask 255.255.255.0 with read only permissions and synchronized mode |
| /home/nfs/ 10.1.1.100(rw,sync) 10.1.1.10(ro,sync) | export /home/nfs directory for host with IP 10.1.1.100 with read, write permissions, synchronized mode, and also export /home/nfs directory for hosts with IP 10.1.1.10 with read only permissions and synchronized mode |
| /home/nfs/ 10.1.1.100(rw,sync,no_root_squash) | export /home/nfs directory for host with IP 10.1.1.100 with read, write permissions, synchronized mode and the remote root user will be treated as a root and will be able to change any file and directory. |
| /home/nfs/ *(ro,sync) | export /home/nfs directory for any host with a read only permission and synchronized mode |
| /home/nfs/ *.linuxconfig.org(ro,sync) | export /home/nfs directory for any host within linuxconfig.org domain with a read only permission and synchronized mode |
| /home/nfs/ foobar(rw,sync) | export /home/nfs directory for hostname foobar with read, write permissions and synchronized mode |
4.2. Edit exports file
Open up your favorite text editor, for example, vim and edit /etc/exports file and add line /home/nfs/ *(ro,sync) to export /home/nfs directory for any host with read only permissions.
Be sure that the directory you export by NFS exists. You can also create a file inside the /home/nfs directory which will help you troubleshoot once you mount this file system remotely.
# touch /home/nfs/test_file
4.3. Restart NFS daemon
Once you edit /etc/exports file you need to restart NFS daemon to apply changes in the /etc/exports file. Depending on your Linux distribution, the restarting of NFS may differ. Debian users:
# /etc/init.d/nfs-kernel-server restart
Redhat users
# /etc/init.d/nfs restart
If you later decide to add more NFS exports to the /etc/exports file, you will need to either restart NFS daemon or run command exportfs:
# exportfs -ra
5. Mount remote file system on client
First we need to create a mount point:
# mkdir /home/nfs_local
If you are sure that the NFS client and mount point are ready, you can run the mount command to mount exported NFS remote file system:
# mount 10.1.1.200:/home/nfs /home/nfs_local
In case that you need to specify a type of the filesystem you can do this by:
# mount -t nfs 10.1.1.200:/home/nfs /home/nfs_local
You may get error message
mount: mount to NFS server failed: timed out (retrying).
This may mean that your server supports higher versions of nfs and therefore you need to pass one extra argument to your nfs client. In this example we use nfs version 3:
# mount -t nfs -o nfsvers=3 10.1.1.200:/home/nfs /home/nfs_local
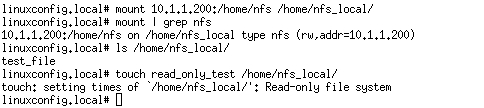
Now you should be able to see that the file system is mounted. Notice that the mount command reports that the filesystem is mounted as “read and write”, although you can see that it provides a “read only” permission.
6. Configure automount
To make this completely transparent to end users, you can automount the NFS file system every time a user boots a PC, or you can also use PAM modules to mount once a user logs in with a proper username and password. In this situation just edit /etc/fstab to mount system automatically during a system boot. You can use your favorite editor and create new line like this:
10.1.1.200:/home/nfs /home/nfs_local/ nfs defaults 0 0
in /etc/fstab or
# echo "10.1.1.200:/home/nfs /home/nfs_local/ nfs defaults 0 0" >> /etc/fstab

7. Conclusion
The Network File System comes with tons of export options. What has been shown here, just barely scratches the surface of NFS. Please visit Linux NFS-HOWTO hosted by linux documentation project or NFS homepage for more details.
8. Appendix A
Following section of this NFS tutorial is going to be devoted to RedHat like Linux systems which by default block all incoming traffic to a NFS server by engaging firewall using iptables rules. For this reason when the firewall is running on your NFS server, you might get this error when mounting NFS filesytem: mount.nfs: mount to NFS server ‘10.1.1.13’ failed: System Error: No route to host. This error message has nothing to do with your NFS configuration, all what needs to be done is either turn off the firewall or add iptables rules to allow traffic on portmap port 111, nfs port 2049 and random ports for other nfs services.
There are two solutions to this problem: easy solution is to turn off the firewall completely and the right solution to add appropriate iptables rules.
8.1. Turn off firewall on Redhat like systems:
The easiest solution is to just turn off the firewall. This will automatically grant access to the nfs daemon to anyone. I would suggest this solution only for testing purposes of your NFS configuration. Enter the following command to stop firewall and clean up all iptables rules:
# service iptables stop
Now when your NFS settings are correct you should be able to mount nfs filesystem from you client machine.
8.2. Add iptables rules to allow NFS communication
This is a more complex but right solution to the given problem. First we need to set static port for nfs services such as rquotad, mountd, statd, and lockd by editing /etc/sysconfig/nfs file. Add or uncomment following lines in your /etc/sysconfig/nfs file:
LOCKD_TCPPORT=32803
LOCKD_UDPPORT=32769
MOUNTD_PORT=892
STATD_PORT=662
Restart you NFSD daemon with following commands:
# /etc/init.d/nfs restart
# /etc/init.d/nfslock restart
Use rpcinfo command to confirm a validity of your new ports settings:
# rpcinfo -p localhost
The output should be similar to the one below:
   program vers proto   port
    100000    2   tcp    111  portmapper
    100000    2   udp    111  portmapper
    100011    1   udp    999  rquotad
    100011    2   udp    999  rquotad
    100011    1   tcp   1002  rquotad
    100011    2   tcp   1002  rquotad
    100003    2   udp   2049  nfs
    100003    3   udp   2049  nfs
    100003    4   udp   2049  nfs
    100021    1   udp  32769  nlockmgr
    100021    3   udp  32769  nlockmgr
    100021    4   udp  32769  nlockmgr
    100021    1   tcp  32803  nlockmgr
    100021    3   tcp  32803  nlockmgr
    100021    4   tcp  32803  nlockmgr
    100003    2   tcp   2049  nfs
    100003    3   tcp   2049  nfs
    100003    4   tcp   2049  nfs
    100005    1   udp    892  mountd
    100005    1   tcp    892  mountd
    100005    2   udp    892  mountd
    100005    2   tcp    892  mountd
    100005    3   udp    892  mountd
    100005    3   tcp    892  mountd
    100024    1   udp    662  status
    100024    1   tcp    662  status
Save your current iptables rules into iptables-rules-orig.txt :
# iptables-save > iptables-rules-orig.txt
Create file called iptables-nfs-rules.txt with the following content:
*filter
:INPUT ACCEPT [0:0]
:FORWARD ACCEPT [0:0]
:OUTPUT ACCEPT [2:200]
:RH-Firewall-1-INPUT - [0:0]
-A INPUT -j RH-Firewall-1-INPUT
-A FORWARD -j RH-Firewall-1-INPUT
-A RH-Firewall-1-INPUT -i lo -j ACCEPT
-A RH-Firewall-1-INPUT -p icmp -m icmp --icmp-type any -j ACCEPT
-A RH-Firewall-1-INPUT -p esp -j ACCEPT
-A RH-Firewall-1-INPUT -p ah -j ACCEPT
-A RH-Firewall-1-INPUT -d 224.0.0.251 -p udp -m udp --dport 5353 -j ACCEPT
-A RH-Firewall-1-INPUT -p udp -m udp --dport 631 -j ACCEPT
-A RH-Firewall-1-INPUT -p tcp -m tcp --dport 631 -j ACCEPT
-A RH-Firewall-1-INPUT -m state --state RELATED,ESTABLISHED -j ACCEPT
-A RH-Firewall-1-INPUT -p tcp -m state --state NEW -m tcp --dport 2049 -j ACCEPT
-A RH-Firewall-1-INPUT -p tcp -m state --state NEW -m tcp --dport 22 -j ACCEPT
-A RH-Firewall-1-INPUT -p tcp -m state --state NEW -m tcp --dport 111 -j ACCEPT
-A RH-Firewall-1-INPUT -p udp -m state --state NEW -m udp --dport 111 -j ACCEPT
-A RH-Firewall-1-INPUT -p udp -m state --state NEW -m udp --dport 2049 -j ACCEPT
-A RH-Firewall-1-INPUT -p tcp -m state --state NEW -m tcp --dport 32769 -j ACCEPT
-A RH-Firewall-1-INPUT -p udp -m state --state NEW -m udp --dport 32769 -j ACCEPT
-A RH-Firewall-1-INPUT -p tcp -m state --state NEW -m tcp --dport 32803 -j ACCEPT
-A RH-Firewall-1-INPUT -p udp -m state --state NEW -m udp --dport 32803 -j ACCEPT
-A RH-Firewall-1-INPUT -p tcp -m state --state NEW -m tcp --dport 662 -j ACCEPT
-A RH-Firewall-1-INPUT -p udp -m state --state NEW -m udp --dport 662 -j ACCEPT
-A RH-Firewall-1-INPUT -p tcp -m state --state NEW -m tcp --dport 892 -j ACCEPT
-A RH-Firewall-1-INPUT -p udp -m state --state NEW -m udp --dport 892 -j ACCEPT
-A RH-Firewall-1-INPUT -j REJECT --reject-with icmp-host-prohibited
COMMIT
Apply new rules with iptables-restore, where the single argument will be iptables-nfs-rules.txt file:
NOTE: this will create a new set of iptables rules. If you have already defined some iptables rules previously, you may want to edit iptables-rules-orig.txt and use it with iptables-restore command instead.
# iptables-restore iptables-nfs-rules.txt
Save these new rules, so you do not have to apply new rules for nfs daemon next time you restart your server:
# service iptables save
Now your server is ready to accept client nfs requests. Optionally, you may restart iptables rules / firewall with the following command:
# service iptables restart